Saturday, October 5, 2013

Mirrored Furniture For Less with Plexiglass

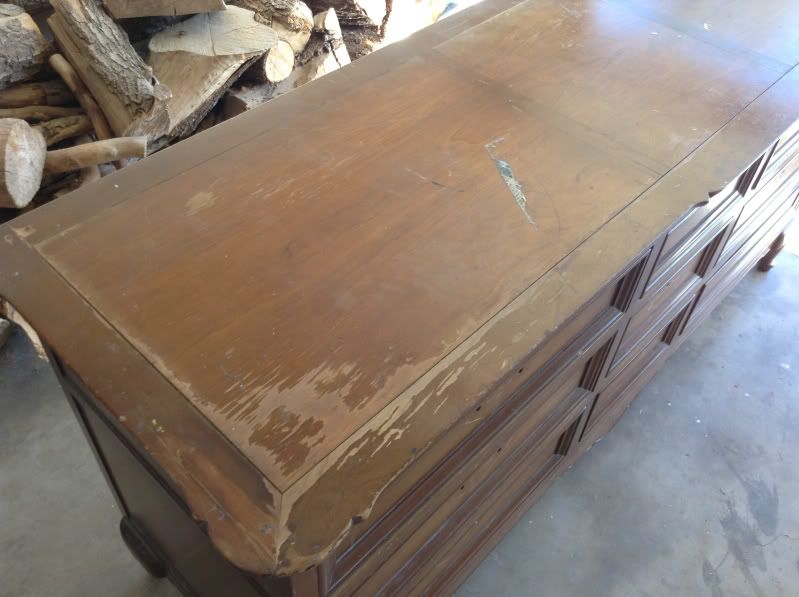
Create a mirrored dresser using plexiglass and looking glass spray paint. Dresser Painted with Martha Stewart Precious Metals.


I linked up with creations by kara. be sure to check her out and link up also if you have something amazing to show off! 

We are moving and since I no longer will have a built in dresser in my closet I needed to get a new one. Our two night stand are the real beveled mirror pieces. So I decided to try to replicate that.. Yes I could have gone and had mirrored glass cut for each section but I didn't want to pay that much.

So it hit me while in hobby lobby there is a product called looking glass spray paint found here. I decided to try that out on plexiglass and see if it would work. It didn't give me the exact thing I wanted but it still looked nice and gave me a way to hide the old hinge holes. It probably works better on real glass; However, the plexiglass was easy to cut.

I found this dresser at a yard sale for a whopping 40$.

que cruddy ipad pictures since my dslr is packed up in a box somewhere.


I had never used a metallic paint before so I headed to home depot to see what they had. I found 3 options. A Rustoleum paint, Spray paint, and the Martha Stewart Precious Metals. The Precious metals matched the closest to what we currently had so I got that...however I wont be rushing to use it again anytime soon I'll elaborate on that a little later...


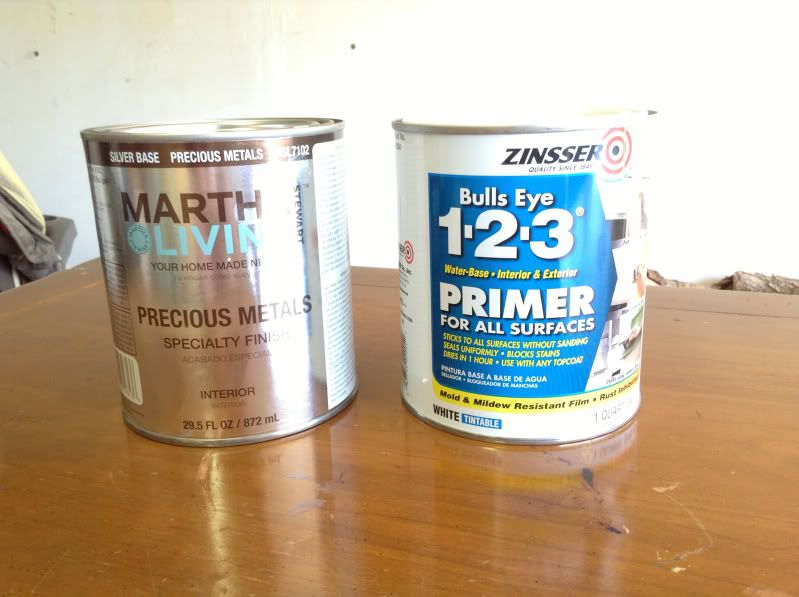
I chose Zinsser primer since I was planning to use this on our upcoming cabinet redo and wanted to see how it preformed.

I started by cleaning off the piece with a damp rag.. I did try a liquid sander but it was basically pointless.. so I just started priming

right is first coat. Left is second coat of primer

I was pretty happy with how the primer went on and how well it stuck.

Next the part that almost made me cry.. I started on the first coat of the silver paint.. see for your self 


I dont know how else to describe this paint other than the consistency of crappy nail polish... It did end up working but after 5 coats.. Maybe i'm spoiled with my annie sloan chalk paint. But painting something 5 times isn't very fun especially after two coats of primer. I also struggled with it being runny.  I had lots of drips to try and catch but at the same time it dried fast so it was hard to keep a wet line to help blend your paint strokes.. it would also cover some areas thicker and leave almost nothing in others. My suggestion would be if your going to use this maybe have your primer tinted closer to a grey so that it covers more quickly.. or try a different product.

Next came the plexiglass 

about 5 coats later.

Here is a picture of one of drawers. The old hardware was brass colored. I contemplated spray painting it. But just decided to get new instead.

this was my test cut of plexiglass. Cut with an exacto blade by scoring multiple times. So you dont crack the edge like in this one.

Here shows my solution to hiding the old hardware holes. 

I cut all the plexiglass to the size needed.. then laid out and followed the directions on the spray paint. I left the plastic coating on while cutting and on the unpainted side while spraying.. 

I watched a google video on how to drill through plexiglass and the guy recommended a drill bit called the step bit. here. It worked great. Went through so easy and didn't crack the plexiglass. 

I drilled my drawer holes with a reg drill bit. 

Thats about it.. I installed the new drawer pulls. I had bought some liquid nails for mirrors, but found the pulls held the plexiglass in place, so I skipped it. Figured I could change it out if I got tired of it. I'm still debating on if I want to glue the side ones in place. Right now I decided to wait. 

I hate giving a product a bad rap.. Maybe I didn't use it right.. but it did take me 5 coats before I was finally ok with the way it looked. I will say it does seem to have stuck well. Only time will tell.

Anyone have any better luck with the Martha Stewart paint. Im curious to know?  


more reflective in person
sorry for the bad photos
The best part....


Total cost beak down
dresser                 $40
paint                    $28
Plexiglass           $10
Spray paint         $12
New pulls            $ 33

total cost:          $123


LINK UP!!!!!!


Wednesday, October 2, 2013

We are Moving!


So our house has sold and our offer has been accepted on our new house we found! We have worked with an amazing friend and agent, Christine Wyly ,for several months and many home viewings. We finally found a great deal on a 4 bedroom home in one of the newer subdivisions. The downside? Well it's new. HUH? I know most people would love a new house but man are they builder grade, well in our budget they are builder grade.

The good news lot of projects, and upcoming blog post on diy!  I have some big plans for this little house.

So here is some of my inspiration so far... and if you have any suggestions feel free to chime in!


Im thinking my first project will be the kitchen, because it such a small job, haha yeah right. I do see a lot of potential in this room though. Here are some of the changes I want to make.

  • Paint the cabinets
  • remove floor tile backsplash (still don't understand why they think its a good idea to use floor tile)
  • use beadboard or subway tile for the new back splash
  • build a plate drying rack to go over kitchen sink
  • I have found a neat old cast iron stove I'm contemplating for the island, or build an island. 
  • paint walls. 
  • remove a few panels to add glass to cabinets. 

Chalk paint the kitchen cabinets and install beadboard or subway tile.


I want to instal high board and batten in most of the rooms.

intal wainscoting around master bath and possibly walls.

Ok this one may seem a little odd.. but I really think it would help out the living room. Even if it is faux.  There are no windows so no focal point in the living room and the ceilings are 10ft high..
faux fire place

most of the door ways are either not framed or have very small molding. So I'd like to beef that up a tad.


not sure I'm going to be able to convince Adam of this one, but a coffered ceiling would look so good in the living room.

and thats just some of the ideas of where this is headed. I love the layout of the house and the fact that it has the extra bedroom that we were really needing for A. my craft room :) and of course when we have family come.


SITE DESIGN BY DESIGNER BLOGS