Wednesday, November 13, 2013

YEAH!!! first room in new house almost complete... and its....... the laundry room

FINALLY!!!!!!!

It feels like I have been painting for forever! Probably because I have painted for like 2 weeks straight. First it was our new bed which is still in need of finishing. Then I had to paint the master bathroom. Thanks to the investment company that previously owned the house we purchase and decided to spray everything including all trim and ceilings a wonder vanilla color I had to paint everything..seriously ceiling, trim, crown, doors, and walls.

I decided to start on the laundry room thinking I could finish it quick. Should have known my Plans never work out to be that simple.

I am not one to go super modern but I had an itch to do something super fun graphic and colorful. Im not sure how long it will stay this way but it's fun for the moment and looks so much better in person than I was able to capture on my phone.

So here it is our new super fun laundry room. I still have a few things to finish up such as finding a fun rug, installing crown molding, painting the ceiling, and building a folding and sorting station that will fill the space where the laundry basket and trash can are. I also have to spray and hang my light. But I fee like I can now take a break from this room and maybe catch up on the piles of laundry that are everywhere.

Colors:
Sherwin Williams
Exuberant Pink
Pure white
Frolic
Peppercorn


coming in from our garage. 

coming in from hallway


These frames may be repositioned and the pictures are going to be replaced as soon as I get some printed... its on the to do list :)

........and just for fun.....
Obviously my husband doesn't have to do the finishing work.... thanks babe
if you cant find the stud try, try, try, and maybe try again...

Tuesday, November 12, 2013

How to paint a herringbone wall with sharp lines even on heavy texture


So I'm not one to normally do modern; However, while picking out the perfect grey for our bedroom at Sherwin Williams (still not sure if I got that right) these super fun colors popped out at me.

I was pretty worried about the paint bleeding through since our walls have such a heavy texture.. but it didn't it worked great and here is how you can get it too...


herringbone pattern


divide up your wall

 I used the yellow frog tape. Since we had just freshly painted our walls. 

 First you need to decide how you want to divide up your wall. I did mine at 16.5 it got me the closest to being even with out some random fraction

mark the ceiling and baseboard with tick marks at your desired measurement this will help you to get your lines straight.. make sure you stand back and check for evenness.

after you have taped all your vertical lines you can start on you diagonals. You need to pick how thick you want them I did mine 8 inches. I wish now I would have done them more skinny.

Here is my poor attempt to draw a visual.... no laughing

starting in your left top corner measure your desired width down from the ceiling on your second vertical line. Mine was 8 inches. Stretch your tape from the top corner down to you line you drew. Continue measuring out you widths.. Make sure you measure from the base of the tape not the top. Hope that makes sense.


This part takes a long time just be patient. 

Now the magic trick... how to get 0 bleeds... 

Take your wall color and paint over your tape lines... I really slapped mine on, making sure to brush over it several different ways.  What this does is push paint into any gaps that may not be sealed by the tape. This seals in that area so that no contrast color bleeds through. 

Then you can start on your contrast color.
I suggest using a high end paint nothing cheap the thicker the paint the less likely it will be to seep under the tape.. I used sherwin williams and its plenty thick. The hot pink was almost like peanut butter with a little water added. It was almost too thick, but Im guessing its because there is so much pigment to achieve that super bright color... 
Surprisingly the white covered the best. I only needed two coats of it while the green needed 3 and the pink needed 4. 
Carefully peel of your tape lines and enjoy your new herringbone wall!
My paint did dry some as it took me a while to get all the coverage done... However I don't think I would leave it over night or anything before peeling your tape off. 
I had to do each wall one at a time to make sure I had enough time to finish it and get the tape off before the kids were awake. I still have one more to go. 
Frog tape is pretty amazing it works quite well by itself without the whole painting over it but I wouldn't trust it on a project like this... 

Here is a comparison of non painted vs painted... I decided to only go half way up my long wall since im going to be adding some board and batten and wall hooks... I taped off my line with just regular green frog tape and didnt worry much about bleeding as it will be covered with a board. The tape preformed pretty well but its not as crisp as the painted over tape. 
reg green frog tape separating the half wall


top of white line was with reg non painted over tape you cans see the small bleeds


with painted over tape very sharp lines...
You can use this idea on on anything trim ect.. Hope this helps and inspires your to try something a little more daring.. 

Hoping to have the whole room done soon.. After just moving in to our house there is so much I'm working on along with two little ones that keep me busy. Late nights are my new best friend as of recently..


Monday, November 4, 2013

How to build a restoration hardware Maison inspired bed using ana white's platform base to start


The Finish tutorial is up.. you can see it here.


The DIY'ers

Thanks so much to Kayal for featuring this post on her blog contest! 


Anyone have $2000 I can have?................ No one? That's ok I figured out a way to get a similar look for way less.. I still haven't sat down and added up the total but it should be under 350.

The reason I wanted $2000.....
Restoration Hardware Madison bed without footboard
I love the look of this bed. I found a way to somewhat replicate it. Im currently waiting on more nail head trim to finish so I thought I'd make this a two part tutorial..the build and then the upholstery and finish..

The best part about this bed....Adam liked it... we actually agreed on something. It also makes it a little easier when I say......"hey, so, um, I have something I want us to build....." waiting for eye roll..."but you will really like it.." show picture explain to not so willing husband all my plans and how I think we can put it together....finally a reluctant yes. 

Fast forward 10 mins later (it takes me that long to drive to Lowes :) ) two poor young Lowes employes helping me sift through the cheap wood looking for straight board.. find everything I need and am on my way back on a mission. 

So enough with the blabbing lets get to the good stuff..... here is what I came up with.. I love ana whites plans, and it was while browsing through that I saw this platform bed that I realized I could get the look I was wanting.. 

Here are ana's plans for the platform part.. follow her directions to build.. I omitted the two 1x3 at the back top and bottom where the headboard will be going.. we also capped our corners with some corner trim. I will show in the pictures.. first read through these plans....

Here are some photos from our building process.

Measure out your 1x6's

Cut 1x6's


assemble your box. we used our kreg jig and glue

screw  in your support 1x2 two on each side and one in the middle


Cut your 1x3 and drill counter sink holes and predrill.

counter sink hole 

attach 1x3 to top and bottom of box. DO NOT ATTACH TO END WITH HEADBOARD

add your cove molding

cove molding down side

To build the legs I used fence post tops :) I had originally picked up some turned furniture feet at lowes but I saw these as I was heading to check out and changed my  mind I liked the sharper more square edges and they were cheaper only $3.46 each.. 

Beware this is pressure treated wood. Make sure you wear a mask when sanding it down a little more smooth...
find it here


To secure the legs we needed something to put them in. we took some of the scrap 2x4 and marked off where to predrill the hole to screw the fence post.. i mean legs into :) we used a bit smaller than the threaded end of the feet.. I think we measured 1 inch from edge then found the center.

predrilling for feet 

attach 

attach some more :)


How we built the head board

extra material needed.

6 1x2 @ 6ft 
22.5 inches of corner molding 
Be careful with your cove cutting and you should have enough to do the headboard also.. 


Here is a diagram of how we assembled the headboard hope it makes sense. You basically cut your plywood to the length you need making it flush with the edges of the base of the bed, we left the height the original 4ft.. Next measure and cut your 1x2 to frame the front of the plywood making outer edges flush with plywood. Then measure and cut your cove molding. Angles are at 45 degrees. Finally trim your outer sides and top of the headboard with the three remaining 1x2s. Look at photos if this is confusing sorry.


pretty simple cut to fit. we left it 4 ft tall. 

We needed the head board to be removable to get it in the house so we used some scrap 1x3 to attach it. 


fill all your seams and screw and nail holes. I like dry dex because its easier for me to work with than caulk.

Here it shows the 1x2 and cove that is placed on the front of the plywood... its then topped and edged with the other 3 1x2's


restorations hardwares side of headboard view

Us attempting to replicate lol not so much but a little visually interesting.. we routed the part out and sanded some.. you can just apply the reg 1x2 square.. they really dont show unless you walk in with the side of your bed in view.. which is typically a no no in design of a bedroom :) 


We attached corner molding to make it look more finished and so I wouldn't have to wrap the fabric around all the edges when upholstering. 

OHHHHHHH YESSSSSS sneak peak of the finish....Stay tuned tutorial to come soon...and its really very simple to do! 


Saturday, October 5, 2013

Mirrored Furniture For Less with Plexiglass

Create a mirrored dresser using plexiglass and looking glass spray paint. Dresser Painted with Martha Stewart Precious Metals.


I linked up with creations by kara. be sure to check her out and link up also if you have something amazing to show off! 

We are moving and since I no longer will have a built in dresser in my closet I needed to get a new one. Our two night stand are the real beveled mirror pieces. So I decided to try to replicate that.. Yes I could have gone and had mirrored glass cut for each section but I didn't want to pay that much.

So it hit me while in hobby lobby there is a product called looking glass spray paint found here. I decided to try that out on plexiglass and see if it would work. It didn't give me the exact thing I wanted but it still looked nice and gave me a way to hide the old hinge holes. It probably works better on real glass; However, the plexiglass was easy to cut.

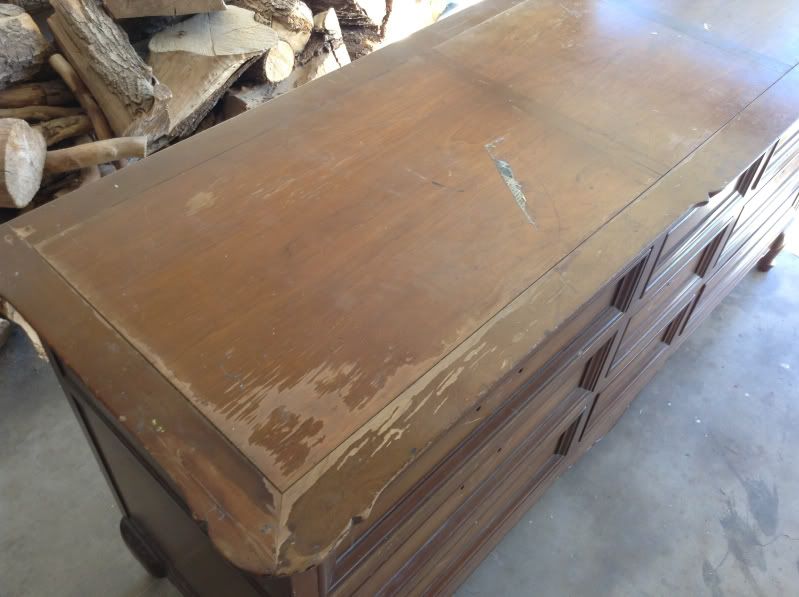
I found this dresser at a yard sale for a whopping 40$.

que cruddy ipad pictures since my dslr is packed up in a box somewhere.


I had never used a metallic paint before so I headed to home depot to see what they had. I found 3 options. A Rustoleum paint, Spray paint, and the Martha Stewart Precious Metals. The Precious metals matched the closest to what we currently had so I got that...however I wont be rushing to use it again anytime soon I'll elaborate on that a little later...
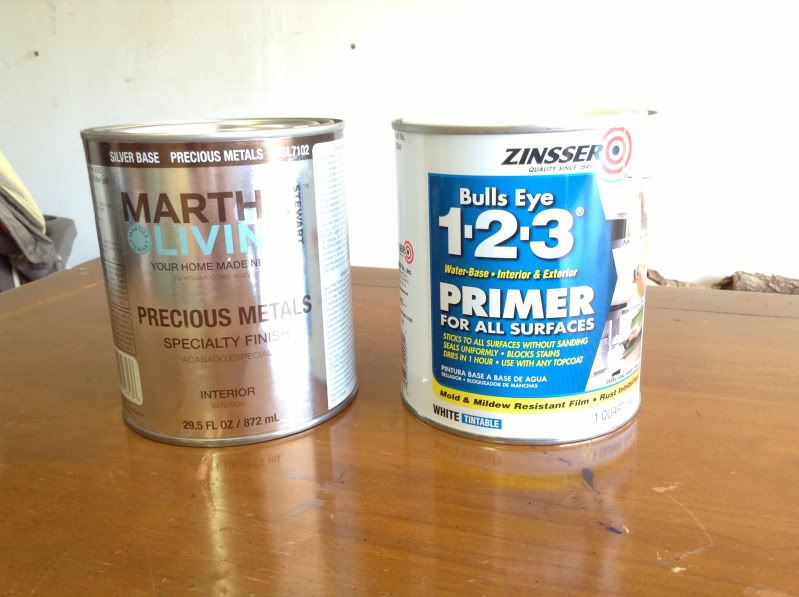

I chose Zinsser primer since I was planning to use this on our upcoming cabinet redo and wanted to see how it preformed.

I started by cleaning off the piece with a damp rag.. I did try a liquid sander but it was basically pointless.. so I just started priming

right is first coat. Left is second coat of primer

I was pretty happy with how the primer went on and how well it stuck.

Next the part that almost made me cry.. I started on the first coat of the silver paint.. see for your self 


I dont know how else to describe this paint other than the consistency of crappy nail polish... It did end up working but after 5 coats.. Maybe i'm spoiled with my annie sloan chalk paint. But painting something 5 times isn't very fun especially after two coats of primer. I also struggled with it being runny.  I had lots of drips to try and catch but at the same time it dried fast so it was hard to keep a wet line to help blend your paint strokes.. it would also cover some areas thicker and leave almost nothing in others. My suggestion would be if your going to use this maybe have your primer tinted closer to a grey so that it covers more quickly.. or try a different product.

Next came the plexiglass 

about 5 coats later.

Here is a picture of one of drawers. The old hardware was brass colored. I contemplated spray painting it. But just decided to get new instead.

this was my test cut of plexiglass. Cut with an exacto blade by scoring multiple times. So you dont crack the edge like in this one.

Here shows my solution to hiding the old hardware holes. 

I cut all the plexiglass to the size needed.. then laid out and followed the directions on the spray paint. I left the plastic coating on while cutting and on the unpainted side while spraying.. 

I watched a google video on how to drill through plexiglass and the guy recommended a drill bit called the step bit. here. It worked great. Went through so easy and didn't crack the plexiglass. 

I drilled my drawer holes with a reg drill bit. 

Thats about it.. I installed the new drawer pulls. I had bought some liquid nails for mirrors, but found the pulls held the plexiglass in place, so I skipped it. Figured I could change it out if I got tired of it. I'm still debating on if I want to glue the side ones in place. Right now I decided to wait. 

I hate giving a product a bad rap.. Maybe I didn't use it right.. but it did take me 5 coats before I was finally ok with the way it looked. I will say it does seem to have stuck well. Only time will tell.

Anyone have any better luck with the Martha Stewart paint. Im curious to know?  


more reflective in person
sorry for the bad photos
The best part....


Total cost beak down
dresser                 $40
paint                    $28
Plexiglass           $10
Spray paint         $12
New pulls            $ 33

total cost:          $123


LINK UP!!!!!!


SITE DESIGN BY DESIGNER BLOGS